“Compromise used to mean that half a loaf was better than no bread. Among modern statesmen it really seems to mean that half a loaf is better than a whole loaf.”
– G.K. Chesterton, Novelist, Essayist
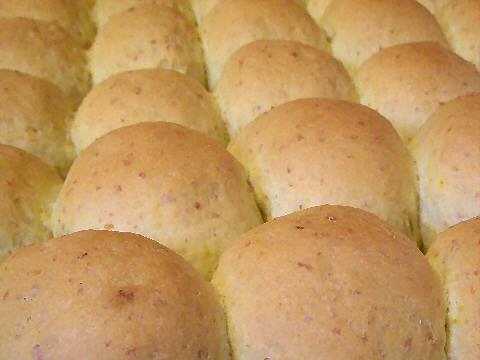
Buenos Aires – Breaking bread is our bread and butter, which requires bread, and butter, but even buttering up the bread baker it was costing us more bread. For the first year and nearly a half of Casa SaltShaker’s existence we relied on a local baker to provide bread rolls for dinner. They made good quality, tasty rolls, not the usual tasteless white stuff that passes for the staff of life here. And when we started off, they were 20 centavos a roll, but they gave us a discount and we were picking them up for 15 – that meant, since I was grabbing four dozen for a dinner of twelve folk, that we were spending a whole AR$7.20, or, at the time, US$2.40, for bread for a dinner. But steady inflation brought the cost per roll up to 40 centavos in just about 16 months, and, they stopped giving us any discount, claiming they were “losing money”. That meant, just for bread, we were spending AR$19.20, or just over US$6 – but really, just pretty ridiculous prices for rolls in our book. Even when we cut back to three dozen, which actually seems to be enough, it was still pricier than I wanted to shell out. Their claim of loss was simply ludicrous, given that I can turn out the recipe below for three dozen, for about 5 pesos, and that’s paying retail for my ingredients, including top quality olive oil.
So, I started experimenting around with bread recipes – discovering fairly quickly that recipes that I’ve used for years simply didn’t turn out the same here. The flour is different, the water is different, and anyone who spends any time baking, knows that those are key factors. It took some work, but I finally came up with a good, solid recipe that works with the local ingredients – one major thing for anyone here trying stuff out, I’m finding I need roughly one-third more liquid than I did for the same recipes in New York. I assume it’s some sort of absorbency level of the flour.
So, we have a basic “olive oil bread” roll that we’re now using, which is easy to vary if I want to flavor it with something that fits a particular cuisine – e.g., for last week’s Indian dinner I added a touch of cumin, turmeric, and mustard to the recipe – a mere ½ teaspoon of each, but it added a nice subtle flavor that fit the meal; or for our Louisiana Cajun/Creole dinner, I substituted molasses for the sugar. I’ve also started making flavored butters to go with the breads – mixing in a bit of chopped rocotos for our Peruvian dinner, ground peperoncino for our Portuguese dinner, smoked salt and drained tomato pulp for our Uruguayan eve, something that I think complements the flavors of the meal – so I’ll be starting to add notes to my dinner writeups on any changes that I make to the base recipe.
I think it’s wonderful you’re making your own bread. It only adds to the dining experience at Casa SaltShaker. How interesting that the flour and water make a difference. I just started learning to bake bread. I made my first challah the other day. I used yeast for the first time. 😉 Turned out pretty well. I can’t wait to try your Olive Oil Bread Rolls.
Paz
P.S. Oh! Can I use 5 cups of white flour instead of the 1 cup of Whole wheat?
Yes, absolutely. In fact, the olive oil flavor comes through really clear if you use all white flour. I just like them with a little bit of that whole wheat nuttiness.
I can see an upcoming series of new posts on your site – in addition to photo Mondays, perhaps Yeast Thursdays!?
You’ve inspired me to (make Hal) make some bread! He used to make it all the time in Key West but he’s slacked off here. Time to get out the whip – NOTHING is as good as homemade bread. Except maybe the soup that goes with it!
Yay! I’m glad I can just use the All Purpose white flour alone. I’m not to crazy about the whole wheat.
LOL! A ‘Yeast Thursdays’? I like the idea alot. Now I have to find the time.
Oh, btw, proofing for only 5 minutes? How come for so little time, when I’ve seen other recipes for their breads to proof longer. Just curious. I learned about proofing, for the first time, only a few weeks ago when I made cinnamon rolls… Interesting term.
Paz
“Proving the yeast” is merely making sure that it activates and begins to grow. Once it’s bubbling away and clearly growing, leaving it for longer is unnecessary – the key is really the length of time that you let the dough rise – because that’s the action of the yeast in conjunction with the flour. I guess if you let the yeast colony grow a bit more, then when it’s mixed into the flour, there’s already more of it to start working – on the other hand, if you leave it too long, it runs out of food – after all, there’s only two teaspoonfuls of sugar in the water, and it starts to die. That’s also one of the reasons behind the types of breads made with a “sponge” or a “mother” – you add some flour in too, and then let it sit in a cooler spot so the yeast doesn’t grow as fast, but it has plenty of food to keep going until you’re ready to use it – and you can always “feed” it by adding a little more flour.
Ahhh! I’m beginning to understand now. Thanks, Dan.
Paz
[…] Saltshaker […]