“A journey of a thousand miles begins with a new hat.”
– axiom for any proper traveler…
Buenos Aires – As I’ve mentioned a couple of times recently, my new hat is “cheese making student”. It’s one of those things that I was always curious about, principally, I suppose, because I really like cheese, but also because, at least for some of the more basic cheeses, I hear about chefs and cooks and folks at home making their own. Now, I’m hesitant, I must admit, to recommend the teacher whom I’ve found. Here’s the pros and cons, and you can make your own choices, if the idea even interests you, and you’re local (he also teaches meat curing, sausage making, preserves and pickling, beer and wine making). Hector’s very knowledgeable, really – he’s a former professor from the school of agronomy here, and the whole fermentation thing was his specialty; the teaching is 1 on 1 (or at most 3, if you want to organize a group of friends); he’s patient and thorough; he’s got things organized in a step-by-step fashion, along with printed materials that he’s written; his classes are inexpensive. I noted he’s a former professor… i.e., the man likes to talk… at length… about the processes… I’m dredging up organic and biochem, algebra, and a few other topics I haven’t thought about in a couple of decades, because he really starts with the basics – cows, milk production, what effects different dairy farming methods have on milk, quality of milk, chemistry of milk, etc… hard enough for most of us in our native language, and I’m having to do it in Spanish (he doesn’t speak any English, which may or may not be an issue, depending on you). He teaches out of his house in Villa del Parque, which is a long way out for a lot of people – I happen to enjoy the ride (124 bus to Plaza Aristóbulo del Valle or San Martin train line to Villa del Parque station), but it does take some time out of the day. Weighing those factors is, of course, an individual process. If all that comes up to some interest, you can contact him – Hector Coralo, at 4503-6312.
I’ve had two sessions now. The first was dedicated to that whole milk production and chemistry thing, which I’m still working my way back through my notes on, along with various methods for testing the quality of the milk – in particular its density, temperature, and acidity. We then moved on to the most basic of cheeses, ricotta, along with how to turn this really good ricotta into some of the best cream cheese you’ll ever spread on a bagel. Session two we delved deeper into acidity, and then on to protein and fat content, and the various tests thereof, and then looked at the basic coagulation process and how to make a basic soft cheese, and mascarpone. So, jumping right in… let’s talk ricotta… I’m just going to outline the process, with some photos of my first home attempt – homework, you know… I like homework that I can eat…
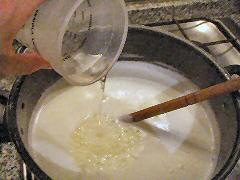 The first step is to pour three liters of whole milk into a pan – that’s about 3 quarts plus 2/3 cup. Now, I had always heard that you wanted raw milk for cheesemaking, and indeed, apparently for some types of cheese you get a better or more interesting or maybe just different cheese. But pasteurization is part of the cheesemaking process – you’re going to heat the milk to pasteurizing temperatures anyway, so pasteurized milk is not an issue. Ultra-pasteurized, which is pretty much all that’s available here, works too – for cheeses that require coagulation using rennet – more about which in a later post – you need to do some things to the milk to get the cheese to turn out right, but for ricotta, it’s just the milk in a pot. Heat it up to 85°C or 185°F. Remove from the heat and add 90ml (3 ounces) of vinegar – plain white vinegar is best, but you can use white wine vinegar, apple cider vinegar, I suppose you could even use red wine vinegar, though your ricotta might turn out pink…
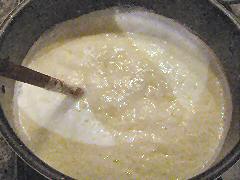 Stir the vinegar in gently, and then simply walk away for five minutes… well, at least the first time or two you won’t be able to, you’ll be anxiously peering into the pot wondering if this is all going to work out or not. It will. You’ll see it happening fairly quickly, the milk starts to curdle… curds and whey, remember? What’s happening is that the heated fat and fat soluble protein (mostly casein) are separating out and clumping, forming curds. The liquid remaing, the whey, has all the water soluble stuff in it, some other proteins like albumen and globulin, and vitamins. After five minutes, come back, and…
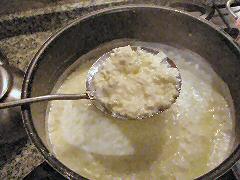 … you’ll have a pot full of gloppy mess. Using a slotted spoon (small slots or holes, you don’t want the curds falling back through), start ladling the curds out of the pot, letting the liquid drain off, into a cheesecloth or plain white towel (not fuzzy, please, you don’t want fuzz in your ricotta), that you’ve lined a strainer or colander with, over a bowl. Continue ladling until you’ve gotten most of the curds out, then you can take the remaining liquid and pour it through either another cloth or a fine strainer (saving the whey, please…) and then take those last bits of curds and add them in with the rest.
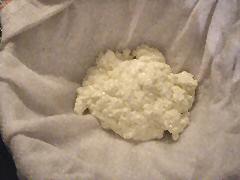 And, you’ve got what looks more or less like cottage cheese (it’s not, that’s a different process), sitting in this cloth, draining into a bowl… just close the cloth up over it so it doesn’t dry out, and put it in the refrigerator to chill (yes, you can taste it at this point – you’ll never go back to commercial grade ricotta again if that’s the stuff you’re using). It’ll take an hour or two to chill – not long – 3 liters of milk results in roughly 600 grams, about 1-1/3 pounds, of ricotta. Why did I have you save the whey? Well, as noted, it’s got some good nutritious stuff in it – vitamins and protein, and milk sugar – it’s delicious just as is – drinking it warm or cold. You can also use it in recipes – it makes a great addition to stocks and soups that are going to have milk or cream added anyway, or even not – it’s not “milky” enough to turn the flavor or color, it’s actually a sort of very pale yellow. You can substitute it for the liquid in breadmaking. Just don’t waste it.
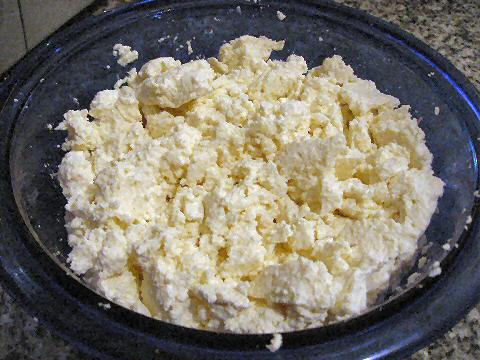
And, the finished product, after draining and chilling, you’ll need to break it up a bit, it’ll all clump together. At this point, use it as you would any ricotta – savory or sweet. Or, move on to my next cheesemaking post, where you turn this lovely ricotta into, as I mentioned, the best cream cheese you’ll ever have.
[…] various recipes and discussions – it’s a fresh cheese, made in a process very similar to the ricotta process I detailed not so long ago – the two differences seemed to be simply that the milk was heated to a […]
[…] all, I started it, posting about taking a cheesemaking class and all – and giving great detail on how to make ricotta, and then an amazing cream cheese substitute. And then I simply abandoned them. Not the cheese, the […]
[…] In New York I never could have simply said one day, “hey, I think I’ll take a course in basic cheesemaking” or, “I keep hearing about all this molecular gastronomy stuff, let me go find out what […]
I’m wondering what could be done w/ savory versions of ricotta made w/ a variety of flavored acitics, an aged balsamic, herbal infusions of vinegar, even myer lemons… What do you know about such combinations? As an artisan baker using a pure white ricotta is simply not required. Do you have any references or recipes ? I look forward to your tasty reply.
Take care
Arden, I’m not really sure what your question is – do you mean using those vinegars to make the ricotta? It won’t make any significant difference, the acid stays behind in the liquid, the fat and protein are what coagulate out. There’s little to no flavor from them, and you’d have to start figuring out adjustments for different acidity levels in order to have the coagulation work right – particularly something like balsamic that has a very low acidity level, same with something like Meyer lemons (even regular lemons are more difficult as you have to figure out the acidity of your lemon juice). You might get a very faint coloring (I’ve used red wine vinegar, at most the cheese comes out a very, very faint pinkish tinge), or perhaps with an herbal one some of the particulate matter would strain out with the cheese. But you’d be best off adding the flavorings after the ricotta is made – treat it as a canvas and work from there. As to pure white ricotta not being useful for artisan bakers, I think you’d find many of them would disagree.
[…] wilted. Season to taste with salt and pepper. Set aside to cool. Mix with a pound (half kilo) of fresh “farmer’s cheese” (or ricotta, or even cottage cheese). Spread out on the dough base to within about an inch of the […]
[…] It didn’t turn out to be some new gastronomic experience, like alpaca or cuy in Peru, but actually something that folks back home probably take for granted. Here, it was simply the finding of a great cheesemaker, someone who’s doing something truly artesanal, Carmine at San Miguel, which, almost as importantly, was part of what led me to taking a fascinating, and completely useful course on the introduction to cheesemaking… […]
[…] I’d used store-bought ricotta, but I wanted to use fresh for the Casa S dinners, so, I made a batch of ricotta. Those of you who’ve been with me throughout this journey will remember I took a whole […]
[…] to the “cream cheese” and an extraordinarily simple process, assuming that you’ve already made the ricotta – he swears this will not turn out right with commercial grade ricotta, and certainly, at […]