“God defend me from that Welsh fairy, Lest he transform me to a piece of cheese!”
– Titania, A Midsummer Night’s Dream, by William Shakespeare
Buenos Aires – I promised more cheese, you get more cheese. That’s the long and short of it, the meat of the matter, the curd… The making of a pasta blanda, or soft cheese. This will be more a simple photo presentation with brief explanation, since you’ll get far more useful information out of a good home cheesemaking book than I can give you here, but hopefully I can provide some insight into the visuals of the process, since having now perused through around a dozen such tomes, it seems that photographs are not their strong suit – some of them being completely unillustrated, others with only a picture of the finished cheese, and a couple with stick figure drawings.
Most of these photos, especially of the process, come from the classroom time I spent – I was in a position to take photos while my teacher demonstrated – I found when I was making one at home, that it was too complicated and things needed to be done too quickly for me to get good photos – you need a second person.
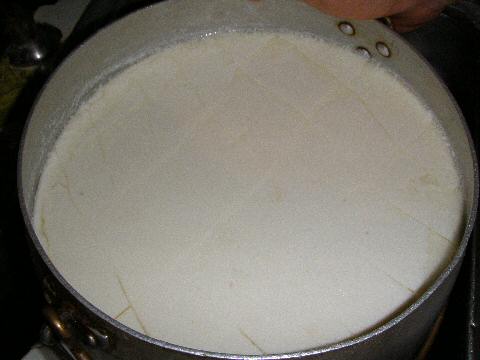
The first step is to heat the milk – we used 10 liters, with the addition of about a cup of heavy cream to add some fat content, a little calcium chloride to make up for the lost calcium in the ultrapasteurization process, and then onto the fire. Temperature and time variables have a big impact on the way a cheese ends up, along with different cultured bacteria, and other processes. For a basic cheese like this, we heated the milk to about 100°F and then added a little homemade yogurt and let it sit for about 20-30 minutes – we wanted a higher acidity, and yogurt is a perfect way to do that. Then we added two cultures to it, that he’d made earlier – both were about a cup and a half of milk with a little milk powder mixed in, and a spoonful of the bacterial culture (you can buy various types from a cheesemaking supply company) – we used a thermophillic and a mesophillic culture, the former is the primary means of culturing a soft cheese, the latter adds specific flavors. We then let it sit a bit longer to start developing the bacterial cultures in the big pot, and then added rennet – which is an enzyme that coagulates milk into cheese. The mixture is quickly stirred well to distribute the enzyme throughout, and then left to sit, untouched for about half an hour in this case (different cheeses, different lengths of time and amounts of rennet). This first photo illustrates the first key process, once the cheese is set and about the texture of soft jello – I don’t quite understand the physics of it all, but using a long knife, you cut the cheese into a checkerboard pattern – and cutting it with different widths creates different final textures. These cuts are about 2cm apart. We then let it sit for another 10 minutes, until the whey seeping out between the cuts when the pot is jiggled comes out clear.
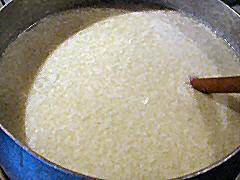
Next up, you agitate the cheese – not with taunts or barbs, but a nice wide spoon or paddle, at first slowly, and then gradually faster – breaking up the cheese into smaller bits – and again, the size of the bits has a dramatic effect on the texture of the cheese – the smaller you break it up, the firmer the cheese will be – because you’re allowing more moisture to be released. Or something like that…
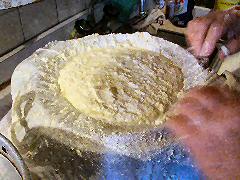
When it’s broken up the way you want it, you pour it through a cheesecloth – a fine to moderate weave cloth – that’s laid out in a colander, to drain out the whey (which can be used for things like making ricotta – the protein that’s coagulated out of milk by rennet is casein, the proteins that are coagulated out by acid are albumen and globulin, so the processes are complementary, and the reason for ricotta’s name – “re-cooked”).
Manually pressing out as much of the liquid whey as you can, you gradually fit the cheese into a mold. At this point, for a soft cheese, you put it through a process called thermoexcitation – if you’re lucky enough to have a way to warm it up to speed up the bacterial growth, you can put it in that warming oven – but otherwise, and what I don’t have a photo of, you put it, in the mold, very near to an open flame, and just turn it every minute or so, so that you keep warming it from all sides – this goes on for about 30-40 minutes, again, depending on the type of cheese you’re trying to make – you spend the time measuring the pH of the whey that’s coming out of the mold, when it reaches a certain point that you’re looking for, you stop.
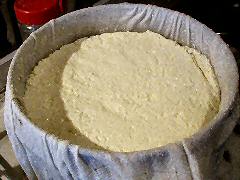
When this process is done, the cheese will be fairly firm. You carefully flip it out of the mold onto another cheesecloth and then fit it back into the mold upside down. You end up doing this a few times, the idea being to make sure it sets evenly. But it’s certainly looking quite cheese-like at this point!
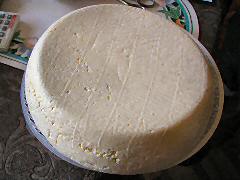
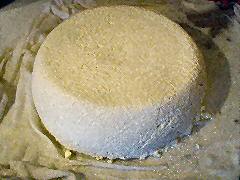
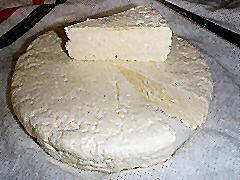
And then, you stick it in the refrigerator, or the colder part of a cheese aging cave (the white wine section of a wine refrigerator is probably perfect) – preferably away from anything smelly, and/or anything that might contaminate it with a mold. The next day, you brine the cheese – literally removing it from the mold and letting it paddle about in a big pot of saltwater that you’ve prepared and cooled. For this cheese it was brined for about an hour (I wasn’t there since it wasn’t a class day, the teacher took care of that, as well as the additional flipping and such). And after that you keep it wrapped in its cheesecloth, which is kept damp with brine, occasionally flipping the cheese over – maybe every 2-3 days. After two weeks, which is the minimum you want to let a cheese like this age, you have something that looks like this.
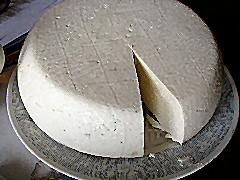
At three weeks, which is more optimal, you take it out, warm it to more or less room temperature, and serve. This came out nice and creamy, very lightly salty. It’s about a 1.4 kilo cheese, or 3 pounds…
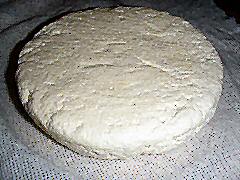
Versus… my first attempt at home, where I somehow or other miscalculated, drastically, the amount of rennet to use, and ended up with this puny little thing of 800 grams, or 1-3/4 pounds. I also clearly need some work at the whole molding process, mine didn’t come out nice and pretty and smooth – but hey, it was a first attempt, with no one watching over my shoulder saying – wait, do this, and this…
It’s interior structure is a bit coarser than the one we made in class, probably from not being pressed into the mold firmly enough, and, being a smaller size, and having left it in the brine for the same length of time as the bigger cheese, it ended up taking on much more salt. In flavor it came out very much like a feta cheese – salty, soft but not creamy. Still, I was quite pleased by the first time out, and more to come down the line…